Showing posts with label baby. Show all posts

Sunday, April 28, 2013

But He Was Still Hungry....

Now that my baby is 3 months away from TWO, I guess it's about time I get around to posting his 1st birthday party details! We went with a Very Hungry Caterpillar theme! In case you missed it, I mentioned the beginning of my planning in this post here.

There is no way I could have pulled this off without planning ahead! Yay for organization!

I designed the invitations myself and had them printed on cardstock at Kinkos. I set them up several on a page and trimmed them out to get the most for my money. 


Of course, I had to serve the five main fruits from the book. We got the leaf place mats as a wedding gift and I taped black circles on them to look like the caterpillar ate through them.
 

I also went nuts making tissue paper confetti. I had a circle whole punch from a college project which I put to good use! My hand hurt for about a day after punching a rainbow of circles. When I had the invitations printed, I also had signs printed which I mounted on foam board and attached to fruit with toothpicks.


For party favors, I put some leftover wedding favor tins to good use! I never would have come up with this idea if I hadn't been cleaning out my guest closet. I hand drew all the little caterpillars on the labels and filled the tins with caterpillar food (skittles).


I displayed monthly pictures on a giant caterpillar going up the stairs. To make it I traced a kitchen plate onto construction paper for perfect circles.


Here's the caterpillar in it's entirety!


I looked EVERYWHERE to find the giant lollipops for the centerpiece I made. Aaaand, I can't remember where it was that I finally found them! I'll update when I think of it. I just re-wrapped them with clear plastic and taped construction paper number 1s to them. Then I stuck them in a plastic bucket. To weight it down I used pennies topped with shiny blue stones (also left over from our wedding and found during the closet clean out).


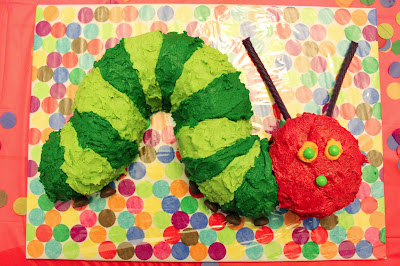
And since you can't have a party without cake, with the help of my talented sister-in-law and mom we made this beauty out of a bundt cake and stacked sheet cake for the head! I made the cake board by modge podging some of my tissue paper circles. And I designed the cake. I may or may not have made a paper mock up of how it would fit together. I also may or may not have researched where I could buy Grapevines candy (Tom Thumb) because the antenna HAD to be purple. I think I got a little crazy in my quest for a perfect 1st birthday party. ;) My sister-in-law did an awesome job of baking the cake and making icing. And my mom did an awesome job of frosting it!

Random fact that I didn't realize until after choosing to do a caterpillar cake: apparently multiple family members of mine had caterpillar cakes for their first birthdays! So it's totally a tradition now. :)

Of course, the birthday boy needed his own mini smash cake! Don't ask me why I thought  his first experience with icing should involve red and green dye!

After trying to find a mini bundt pan, I realized it would be cheapest and easiest to just order a bundtlet from Nothing Bundt Cakes. After my sister-in-law, they make the best bundt cakes! Besides, when would I ever need to make one mini cake again?


Here's the whole table scape. Cake! Confetti! YAY!


I even made this cute little sign for the bathroom door after seeing a similar one on Pinterest.


One thing is for sure... this mama had fun at this party! And I'm going to scale back a tad for the second birthday party!

Any good party planning tips? What was your favorite party as a kid? I think I'd have to pick my American Girl Doll themed party!

Sunday, February 26, 2012

More function, less clutter

A couple of areas in our bedroom that needed some improvement were our bedside tables and the changing table. Yes, we currently share a bedroom with our baby. That is one of the reasons why we want to de-clutter and hopefully move somewhere with a third bedroom! It has been convenient having him in our room, but it is definitely not a permanent arrangement. Our second bedroom currently serves as a guest bedroom for our frequent visits from grandparents and an aunt, as well as an office for my husband since he works from home.

I unfortunately don't have any before pictures for this post because I just started organizing these spaces in the middle of clearing off the bookshelves. I was on a roll! So, I'll have to describe the befores.

Previously, my bedside table had a horizontal stack of books on the shelf below. This was a pain because they would all fall everywhere if I tried to pull one off that wasn't on top. And they wouldn't stand up vertically because of the open sides.

The top of the table had a bunch of mail, papers, and pens. My cat, Ashtyn, was constantly knocking things off of it!

First I took everything off and dusted it. The books got moved onto the bookshelves now that my jewelry relocated and made room. What a brilliant idea, right!? I stacked two pretty boxes on the self. One holds my recently trimmed down greeting card collection and the other contains inspiring design samples I collect for future reference. A spiral notebook rests on top of the boxes.

The only things I left on top of the table are my lamp, alarm clock, and a post it pad in a clear plastic holder that also has room for two pins. The paper clutter got moved to the guest bedroom or thrown out. I love that I now have room to set something on the table temporarily, such as a glass of water. The slippers have now relocated to the closet too so it looks even tidier. The drawer was already organized so I left it as it was. It holds things like my eye mask, lip balm, lotion, bookmarks, and earplugs.


My husband also cleaned off his bedside table so that it is less cluttered. A lot of his books moved to the bookshelves in our bedroom. Some of his random odds and ends went into clear plastic bins for storage. I don't have an after picture of it yet, but it is definitely improved.

The changing table wasn't too bad, but it still had a bunch of random papers on it like instruction manuals for baby gear and print outs from our baby registry. On top of it we keep our diapers and other frequently used items in that fabric bin. Wipes are behind it. Our baby is getting long enough that the wipes will soon relocate to the window sill and the bin will move down to the shelf below.

The second shelf has an extra changing pad, bath toys, a high chair cover, and another bin with various baby toiletries. A lot of them including the medicines will need to relocate once he is pulling up and walking.

The bottoms shelf holds a pink tub with extra wipes. It's pink because it just came in that color from the hospital. We have at least three now and they really come in handy! The bottom shelf also holds diapers, trash bags, and the diaper bag. The diaper bag goes in the empty space. Daddy and baby were out running an errand while I took these pictures. I LOVE our diaper bag! It is this one from Land's End and it really helps us stay organized on the go.

There is definitely some room to grow on these shelves, so it will evolve. I would love to get some matching bins or baskets, but for now this works!

What do you keep on your bedside table? For those of you with kids, what do you store below your changing table other than the usual diapers and wipes?

Monday, February 13, 2012

No more chest of chaos

The dresser chest of drawers in our bedroom had become quite a mess. I always call it a dresser and it drives my husband nuts! This is where we store baby clothes and baby blankets since our closets are full. Some of the drawers were overstuffed and wouldn't close all the way. Plus, some random items had accumulated on top.


To organize it, I started by taking out all of the clothes and separating the too small newborn and 0-3 month clothes. *tear* Since I would love to have one more bambino someday, we are going to store it for now. I grabbed this gray tub that was empty after our trip to Half Price Books and filled it up. It also holds my maternity clothes, the newborn sling for the tub, and the newborn insert for the car seat. I'm going to label it once it is full and put it in the guest closet or storage unit once we clean those out and make room.


Since Mr. Baby is almost to big for his 3-6 month clothes, I cut all the tags off his 6-9 month clothes and washed them. They were in a bag in our guest bedroom still and always getting in the way. Then I filled the drawers back up in a more organized fashion.

Drawer 1: 3-6 month clothes, socks (corralled in a ziploc container that had lost its lid), shoes, and hats


Drawer 2: 6-9 month clothes


Drawer 3: PJs with 3-6 month size on the left and 6-9 month size on the right


Drawer 4: Blankies and some 18-24 month pants my mom scored for next to nothing at a garage sale.


Now the drawers are all set until he grows more! We definitely need to be on the look out for 9-12 month summer clothes. We love finding good deals instead of paying full price and the clothes we got as baby gifts will all be outgrown in another 3-4 months! Although if this summer is anything like last summer, Mr. Baby might be happiest in just his diaper anyway. It was a record-breaking 110 degrees on the day he was born!

The last step in organizing the dresser was de-cluttering the top. The bibs were moved to the kitchen so I no longer have to make that annoying dash to the bedroom. I also put some baby washcloths in there since I use them to clean his hands and face after he eats. The picture above the dresser was way too high and off center now since it used to hang over a TV, so I re-hung it.

Doesn't it look so much prettier now!? I love it and hope we can keep it this way.


We are a little behind on this month's rooms since I was busy scoring an awesome new job and my mother-in-law was visiting, but we hope to catch up and stay on schedule!

Have you organized any drawers lately? Do you leave pictures hanging in random spots for months after re-arranging furniture? Does packing up baby clothes make you cry too?

Tuesday, January 31, 2012

Livable living room

We successfully completed all of our goals for January!

January
Living room
Dining room
Hall closet


Our living room wound up being a place for things that didn't get put away or didn't have a designated spot to be put away...yikes!

Here's the embarrassing before picture.


Here's how we tackled the living room. I started off by grabbing the fleece blankets (ours and the kittys') and throwing them in the wash. Next, I put away the easy to put away items that already had a place to go. I moved the photo albums from under the coffee table to the top of my closet so that our baby doesn't mess them up once he starts crawling. I also put the few books that were under there on the bookshelves. I gathered up all the magazines too... I have a plan for them.

With the coffee table cleared off, I thought about what made sense to store under it. I decided to put all the blankets on the left side, rolled up. Blankets are one of the things that never had a designated spot before! Then the race track toy fit perfectly on the right side so it's not in the middle of the floor when it's not being played with. To the side of the coffee table we have a bin of baby toys and and a couple of larger toys. It will be so nice when he has his own room someday and his toys can go in there.

I also dusted the bookshelves and put away some smaller items that were sitting in front of the books. A part and tools to fix my husband's guitar got put in the guitar case, extra Lego pieces and small toy cars got put into a metal Cars lunch box. Various other items got moved to places that made more sense.

To finish off this room, I gave the futon the makeover explained in my previous post. Here's the completed room. I would still like to change up what is stored on top of the bookshelves, but for now I'm calling this one finished! Can you tell my husband likes books? All of the ones on these shelves are his except for my four college yearbooks.

All we will have to do to baby proof this room now is add L brackets to the bookshelves, add a couple of outlet covers, and put up the sword leaning in the corner. Once he's actually moving around we might rethink what is on the bottom shelves too. We can't have him ripping up all of my husband's car magazines!

Now it's time to keep the momentum going! February is almost here which means it's time to tackle our master bedroom and closet!

How do you store toys? I can't believe how many can be accumulated in just 6 months!