Monday, March 19, 2012

The power of sticking with organization

Today I organized our batteries and tape! These are a couple of items in our guest bedroom/office that definitely needed to be organized. They were both in flimsy shoeboxes that were falling apart. The tape was even sticking to the shoebox it was in.

While we were at The Container Store yesterday — I LOVE that place — we found this battery organization box for $5.99. It holds 12 AAA, 12 AA, 6 C, and 4 D batteries.


At first, I thought that was silly because it would be annoying if you had 20 AA or 8 D batteries and they didn't all fit. Then I realized we rarely have more batteries than what it holds. Plus, it keeps them in place and is compact. A quick glance tells me I need to buy some AA batteries. I was even able to tuck some watch batteries in the skinny space that makes an L shape around the C batteries.


For our tape, I just grabbed this empty Sterilite container I had lying around. It holds duct tape, packing tape, and electrical tape. We have two rolls of each, probably because we couldn't find the tape and bought more. I'm excited about no more tape sticking to a falling apart box!


These two boxes will probably stay on the shelf on the right side of our desk. I'll add a pic once the rest of the shelf is organized. Baby steps!

How do you keep your tape and batteries organized and easily accessible? Do you share my love of The Container Store?

Saturday, March 17, 2012

Paper purging prep

Papers. We all have them. We all know there are some that are important and need to be kept. But organizing them and keeping them straight takes some work!

I haven't been able to file papers for several months because my file drawers are over stuffed. Before running out to buy another file cabinet or file box I don't have room for I started to wonder if I really needed to keep 10 years worth of cell phone bills, 13 years worth of pay stubs, and many other papers. I didn't even know exactly why I was saving all these things! So, I did some research and discovered I have lots off papers I can now shred!


Here's what I learned:
  • Bank deposit slips & statements should be kept for 6 years.
  • Current contracts & leases should be kept for the life of contract + 10 years.
  • Insurance records should be kept for the length of plan + 10 years.
  • Legal correspondence, including marriage & birth certificates, should be kept forever.
  • Paid bills should be kept 1 year. The exception is bills for big purchases including cars, furniture, and computers so you have proof of value if you need to file an insurance claim.
  • Pay check stubs should be kept 1 year and tossed once they match up with your W2.
  • Credit card receipts should be kept 1 month and then tossed if they match your monthly statement.
  • Retirement & savings plan quarterly statements should be kept for 1 year. Keep annual statements until you retire or close your account.
  • Tax returns & supporting documents should be kept for 7 years.
I'll follow these guidelines pretty closely, but with a couple of exceptions. I will probably save receipts for 3 months just in case since some things have 90 day return policies. I also plan to save my first and last pay check stub from each job I've had so I have a record of dates I worked there as well as starting and final salary.

I'm not looking forward to going through all our papers, but I am excited about the results we will have!

Do you save too many papers, not enough, or just what you need? Do you have any tips on what papers are important to keep or ways to organize them?

Pretty file folders above are these from Target.

Thursday, March 15, 2012

Blissful bedroom

It took a couple of weeks longer than originally planned, but our February checklist is complete! We actually tweaked our schedule a little after realizing how intense the bedroom/closet organization is since those areas contain the most stuff. Check it out here or by clicking the plan tab above. Being flexible really helps when trying to complete a huge project like organizing your entire home without being too stressed by it.

February – March 15
Master bedroom
Master closet

To finish organizing our bedroom I finally rehung my painting so it is centered over our bed. It used to be centered until we added the changing table to the right and shifted everything else left. Rehanging the painting took 5 minutes and made a huge difference! I also made the bed, which always makes a bedroom look ten times better.


Before I could make the bed, I had to tackle the wrinkled bed skirt. I washed and ironed it. Then, I put it on the bed before it had a chance to re-wrinkle
. Last year I tried the same thing, but didn't get it put back on fast enough so the ironing was a waste.

I read somewhere recently that you can help keep a bed skirt in place by using bed skirt tacks to attach it to the box spring. While I was googling where to buy bed skirt tacks, I found a list of several ways to keep a bed skirt in place which included using safety pins. I decided to give that method a try since I already had some, making it FREE! I placed one on each corner and one in the middle of each side. So far it is working like a charm.


To finish off the bedroom, I mainly just had to put some things away, dust everything including the baseboards and door frames, and vacuum. It is amazing how much cleaner a room looks with clean carpet and baseboards. We had a couple of piles of "stuff" we went through. Most of wound up neatly put away in the closet or in the trash. All of the papers were moved to the guest bedroom where they belong. However, they aren't filed away yet because our files are full which is making our paperwork out of control. That's the next projected to tackle.

Now, on to the after pictures of our clean and organized bedroom. It is so relaxing to be in there now! I'm going to let you in on a storage secret. Since we are in an apartment and will obviously move again at some point, we saved our moving boxes from the last move. A lot of them are under this bed and the bed in our guest room. It keeps them out of the way and prevents our kitties from hiding under the beds!


Our bookshelves and changing table are staying nice and tidy. I even removed a few more things from the shelves. Also, our little one is long enough now that we moved his diapers below the top of the changing table.


Here's the baby's side of the room. The chest of drawers is also staying nice and tidy. The white thing on the crib is a cat net to keep kitties out. It also will keep Mr. Babycito in when he starts pulling up. It's not the prettiest thing, but it's very functional. And what little boy doesn't enjoy sleeping in a tent?! Since you can't use bumpers with a cat net, I decided to use the bumpers as a bed skirt. Once we make room in the guest bedroom, the glider is going to move in there. It doesn't get used very much where it is now that middle of the night feedings are a thing of the past. In it's place, we are going to put our new pretty hamper! I've still been using my pop up one from college and my husband uses a laundry basket. So, I'm very excited about this change!


Here are my favorite details from our beautiful bedroom.


1. Colorful boxes on my bedside table
2. A painting I made in college
2. My jewelry tray
4. Mr. Babycito's initial from one of my baby showers. It's hung over two small nails.
5. Flowers from my other baby shower and a teddy bear which disguises the baby monitor.

Next up on the schedule is:

March 15 – April
Guest bedroom
Guest closet

I'm pretty sure it will be the most challenging zone, as well as the most rewarding. I'll feel great if we have it finished by the end of April because it is going to be a lot of work.

Are you doing any spring cleaning? Do clean and organized spaces get you all excited too? I am absolutely loving our bedroom!

Saturday, March 10, 2012

The Super Magazine!

I decided I should get rid of some magazines because I never go back and re-read them. The problem is, I knew there were some things in them I would want to go back and look at. I just didn't remember what or where they were. So, I created the Super Magazine!


It's a binder with page protectors and dividers. Now, as I read magazines, I can tear out all of the articles and ideas I want to keep and toss the rest. I love it because everything I want to go back and reference will be organized in one place, and it will take up so much less space!


My Super Magazine has the following sections:
  • Food
  • Decorating
  • Useful Info
  • Exercise/Health
  • Baby
  • Shopping
  • Crafts/DIY
It will be a gradual project to go through all of these magazines plus a few more on a book shelf.


I got a start on it by taking this stack on the left and turning it into the stack on the right in about 15 minutes.

If you want to make your own Super Magazine, you will need:

  • A three ring binder
  • Page protectors
  • Dividers
  • Magazines

What sections will your Super Magazine have?

Wednesday, March 7, 2012

Books, books, and more books

Last May, while we were preparing for our Babycito's arrival, we decided that it made the most sense for him to share our bedroom with us. We had to get rid of our dresser to make room, but then we needed a place to set some of our things that were displaced. We decided that a tall skinny bookcase would fit perfectly on the small wall space between our bathroom and closet doors. So, we found this Billy Bookcase in the Ikea catalog, borrowed a friend's truck, and drove an hour-ish to the closest Ikea store. Or as my husband calls it, Icky-uh.
We got home, took it out of the box, and discovered that we bought the wrong one! It was the same price but much wider. After the hassle of borrowing a truck and paying for the gas to drive 2 hours in it, we decided to just keep it. It just fits. Well, it overlaps the door frames, but not the doorways. And it turns out we could use the extra shelf space. Here are the shelves before. We threw a bunch of things on them with no rhyme or reason. Not so pretty. There was also a pile of stuff on the floor in front of them.


To organize them, I started by taking everything off. Most of the stuff on the floor wound up in our closet when it got organized. Then, I planned out what would go on each shelf. From the top down, it goes:
1) My husband's toys (Lego Ferraris, Lego Buzz, and an Easy Button) which used to be on top of the living room bookcases
2) My husband's additional books and several boxes of keepsakes and odds and ends (he also has three bookcases in the living room!) which were previously on his bedside table and the floor on his side of the bed
3) Some of my books and a couple of picture frames
4) My photo albums and journals. The photo albums were previously on top of a bookcase in the living room.
5) The rest of my books, some of which were previously falling all over the place on my bedside table shelf
6) Baby books. At the rate him and his dad are going, we are going to need a library room!


I removed the baskets from the top of the bookcase because it looks much neater that way. Two of the living room bookcases no longer have anything on top of them either since my photo albums and my husband's Legos were moved onto our bedroom bookcase.

I like having Mr. Babycito's books on the bottom where he can easily pull them off. Also, this bookshelf already has an L bracket holding it to the wall so it won't fall on him.

I am definitely enjoying looking at our bookcase much more now that it is finally organized. I'd love to improve it some more by finding nicer looking boxes and further editing what is displayed on it, but for now it works and is a major improvement!

I would love to someday have our books stored in a hallway like this...

(image originally from houzz.com)

Or artfully arranged on custom turquoise built-ins like this...

(image originally from Brabourne Farm)

Isn't it fun to dream? What do you think of our bookcase makeover? What do you store on your bookshelves? Are they neatly styled or more functional? What would your dream bookshelves look like?

Thursday, March 1, 2012

Closet clean out, part 2

As I mentioned yesterday, we finished cleaning out or closet! Man, it feels good seeing that crossed off my list.

February
Master bedroom
Master closet

In this first picture, you can see how my clothes are organized now. I have my shoe shelves, skirts, pants, and dresses hanging in the back since that is the only floor length hanging space. The top bar on the right is where I hang my shirts, sorted by sleeve length. On the very far left, I have a few shirts that are a little too small but should fit (and I will want to wear) when I lose the rest of my baby weight. I even made a little divider to separate those from the clothes that fit me now but cutting a slit in an index card and writing on it.

Below my clothes, I have a my "dresser" which consists of three plastic drawers. The top one holds bras and undies, the middle one holds pjs, and the bottom one holds socks, tights, and workout clothes. I got rid of a ton of clothes, as you saw in closet clean out, part 1. This even included perfectly good socks because I have way more than I wear. I used to think unless something was broken/worn out/completely out of style I should keep it. But now I'm realizing there is no reason to keep perfectly good clothes and items if I never use them. They just take up space and cause stress!

The shelf in the back of the closet holds my scrapbooks, sewing supplies, and pants I will wear again after I lose a little more baby weight. On the floor way back in the right corner, there is a ton of space but it is hard to get to because of the clothes hanging up. I currently have a big clear plastic storage bin back there where I have started to store keepsake items so they are all in once place. It works well since I don't need to access it very often.


Here you can see my shoe shelves better. My flip flops and slippers are in the pockets on the side of the shelves. The only shoes not on my shelves are my tennis shoes and three pairs of boots. I even have an empty shelf, begging for new shoes! I tried out at tip I read about recently for keeping my boots from flopping over by rolling up magazines and tucking them inside. It works extremely well!


I consolidated and better organized the stuff on the top shelf of our closet too. There is even some extra room now! I stacked up shorter boxes, and filled the yaffa block with bags so that they aren't spread out across the shelf. Less used items are up here since it is difficult to reach without a step stool.


I moved my scarves, belts, and purses to hangers on the wall which gave me more shelf and hanging space. The scarves and belts are hanging from a tie holder. The bags are hanging from my Handy Hold All that I mentioned in my post about the gift of organization.


Here you can see some of my husband's organized clothes closer to the front of the closet. He has even more hanging above these, but I've learned it is quite difficult to take pictures inside a narrow closet! I love having his clothes in the closet instead of piles on the bedroom floor! This is my motivation to keep up with his laundry.


At the very front right section of the closet, my husband has his "dresser" made from silver shelves and Martha Stewart fabric bins. He wouldn't let me label them, even though I asked nicely. If they were mine they would totally have cute labels. Some day, when we have our own bedroom and a real dresser, these can be used for toy storage!


Here's the entire closet! Cleaning it out taught me that big closets might not be as good as I once thought... they just accumulate more stuff! In this shot you can see my hamper in the back. My husband uses a laundry basket in front of his dresser as his hamper. I also had room to put our box fan and a smaller oscillating fan in the closet instead of on the bedroom floor.


Here's the before photo again for comparison. Yay, floor!


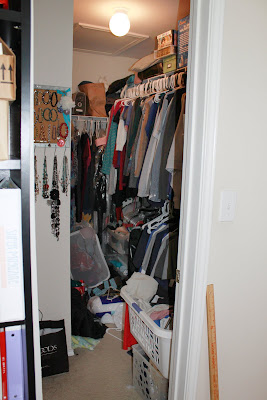
The difference is even bigger than what these photos can capture when it comes to functionality! Half of our clothes weren't even in the closet in these before pictures. Do you keep your closet organized or does it need some work?

We are a little behind schedule on the bedroom, but is about 80% finished and the plan is to make it 100% finished this weekend so we can start on March's space.